Follow me on Instagram

Instagram
Showing posts with label beginner sewer. Show all posts

7.28.2015

Pocket Party Pouch Test Pattern


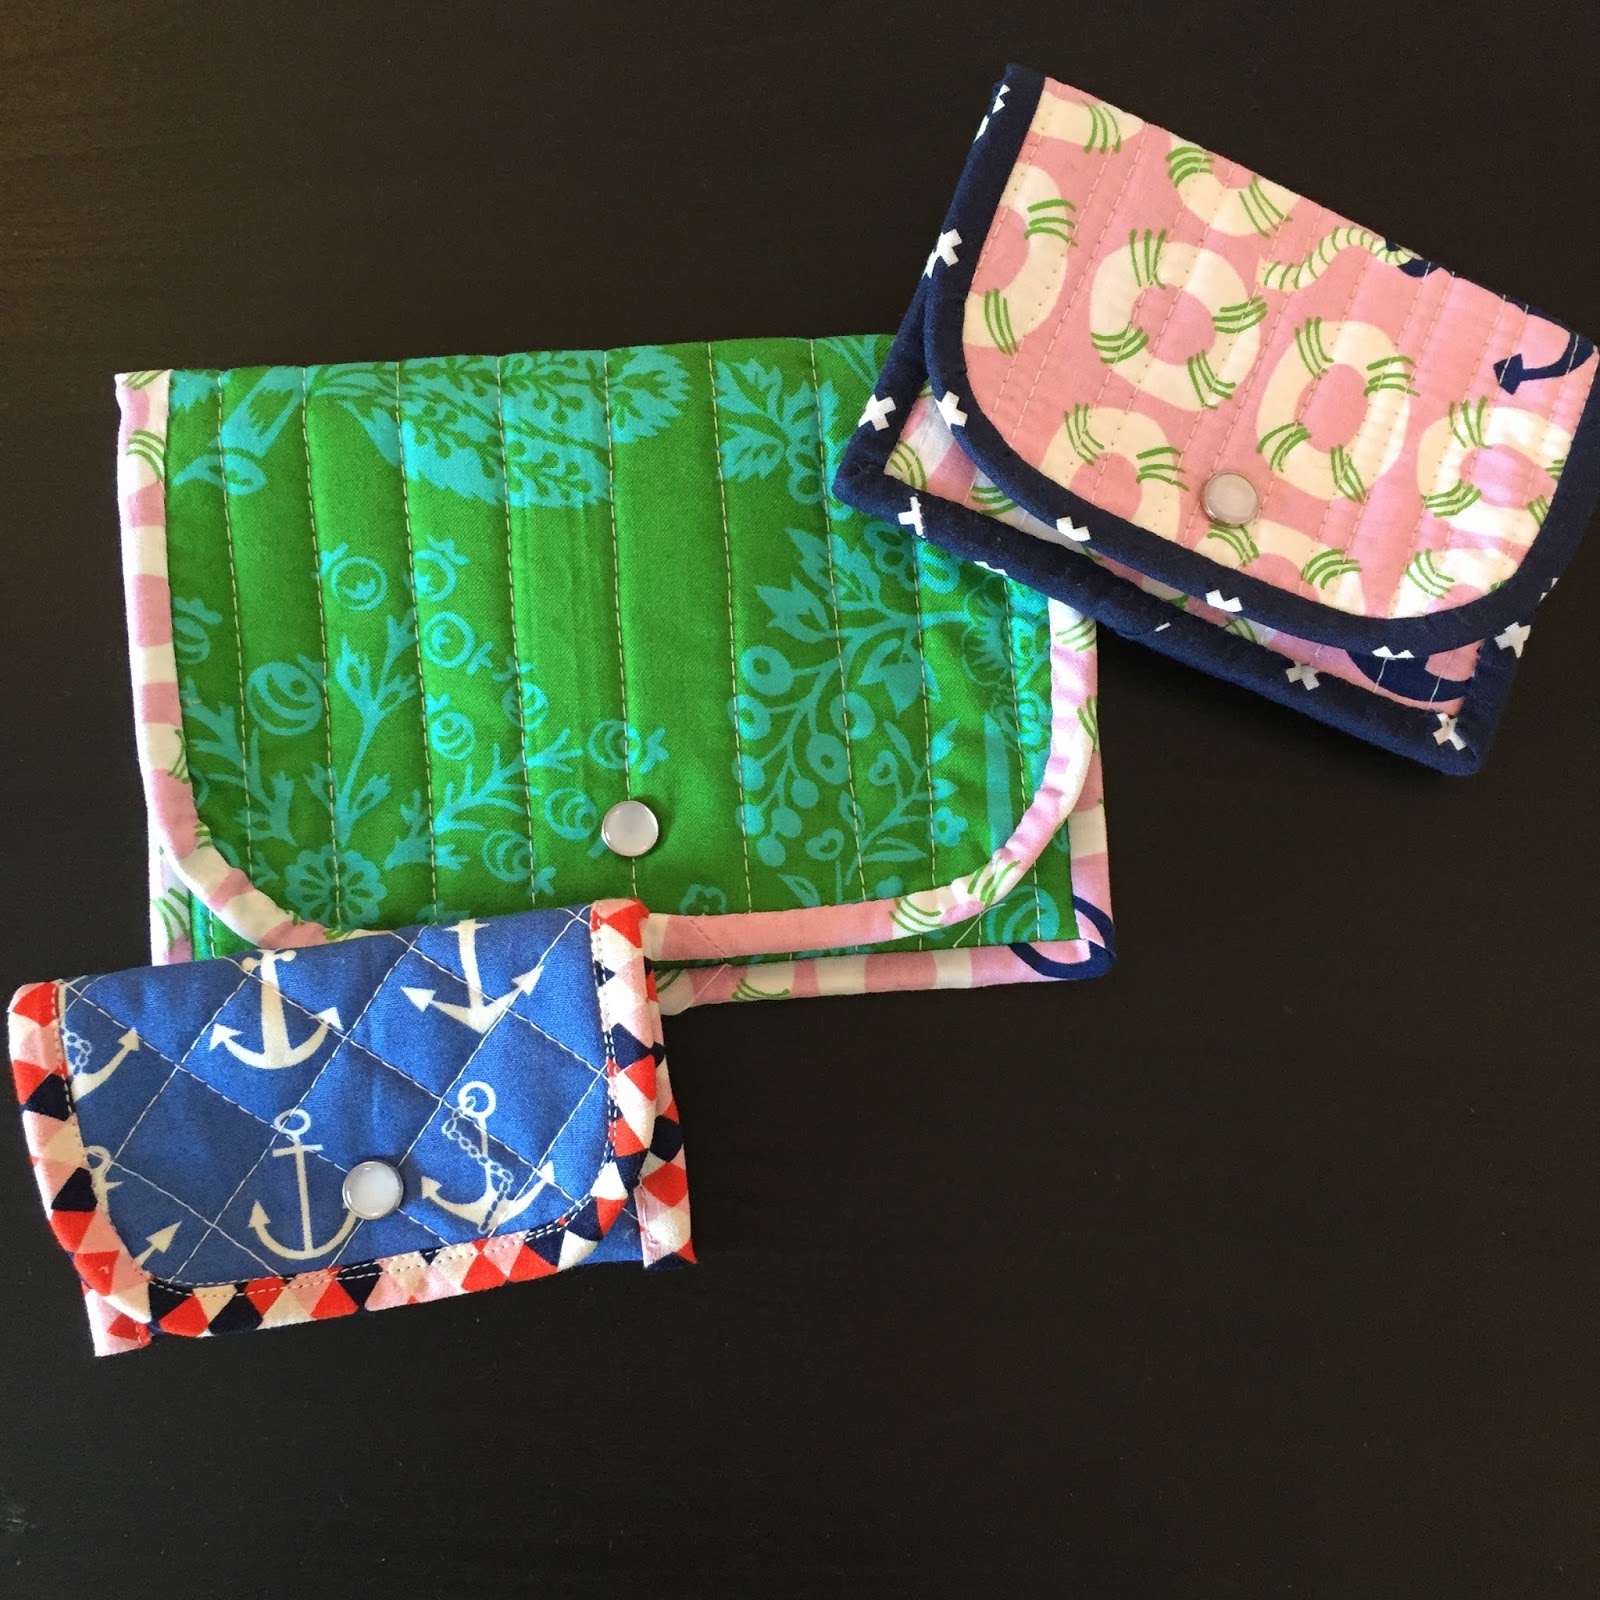
This was a fun one. A quick easy sew too! I was once again able to test a pattern for a friend on Instagram. Micahel Ann from MichaelAnnMade.com just released this fun little pouch. The Pocket Party Pouch comes in three different sizes and is great for not only sewing notions but for a little add on gift as well.


The skill level required to make these is beginner. Although putting the snaps on was trying. I think installing zippers is easier! I think with practice they will get easier. It's just an awkward skill to master.


The small pouch would be great to use a wallet or to give gift cards as a present. There is one pocket with the small pouch. 

The medium pouch would hold an iPhone 4 or 5. It has two pockets. 


The third pouch is my favorite. It holds my iPhone 6. It also has two pockets. I've been using this as a wallet during the summer. 

If you are looking for a fun easy sewing project....this is it! The exterior is quilted but you wouldn't necessarily have to quilt it. It does add to the sturdiness of the project though. So increase your interfacing strength if omitting the quilting portion. 

I also hand sewed the binding down but you could easily machine bind it. 


For all three
Cost: $10
Skill Level: Beginner
Time: Less than an hour 


5.04.2015

Boxy Bags

These little boxy bags by Kelly are so addicting to make. They are FAST too...which is high on my list. I like to see things finished! 

Kelly offers a free tutorial on her website Kelbysews. I've so far made 5 of these bags....so far! They finish at about 10" long so they're great for make-up, travel cosmetics, or other little trinkets. 

You can vary the sizing of the bag by changing the zipper size. The front blue bag is made with a 12" zipper and the back bag is made with a yellow 14" zipper. I want to try and make a tiny one to see how that would work. 

The insides offer such a fun surprise too. 


Also if you're on instagram check out the hashtag #boxybags and you'll see a bunch of variations to her design. Some add handles, make lunch boxes, and mini bags. 
Sewing Level: Beginner- knowledge of zipper installation is helpful but her tutorial does a great job walking you through the steps. 
Time: 1 hour or less
Cost: $9

4.11.2015

One Hour Baskets

 One Hour?! Great!! I could make like three of these while my 2 year old naps. Well, truth be told, the first one took me about 2 hours. Someone told me it's kind of like those 30-minute recipes you make for dinner that take 2 hours....

But since then I've made 3 more baskets and the last one took about 45 minutes.

Here's the front and back of the baskets. They are pretty sturdy! The finished basket is 10" L x 6"W x 7" H

 
It's a great project to use up your scraps because it lends itself to being constructed in so many ways. You can quilt it, scrap it, and even embroider it. 


They are great for sitting on my selves to collect my salvage pieces, scraps and other catch all items.

I think I need to commit to a fabric and make three matching or at least coordinating baskets though! I might have to de-stash these...


I used the same pattern and added ears for a cute little bunny basket for Moses for Easter. Let's just say a 2 year old boy does not appreciate the cuteness factor of the basket- but it does hold up well as it get thrown under the couch, down the stairs and dragged under his radio flyer! 

A few others I've made....


And one my friend made while she and I spent a morning sewing together! 

The pattern is free so head over to Crafty website and download it today. It'll only take you an hour to make ;) 

If you Instagram, you can make yours and hashtag #hourbasket or check it out for style inspiration!

Sewing Level: Beginner
Cost: $10
Time: 1 hour


4.08.2015

My First Quilt

It's definitely going to be a WORK IN PROGRESS! I thought I'd start blogging about the process and just update as I get more done :)

Here's my inspiration: 

My goal is for it to be throw size for our living room. I've calculated I'll need about 72 blocks... so far I've completed 20 and then ran out of fabric. 

Step 1: The fabric pull

I choose Cotton and Steel's August Line by Sarah Watts


The dark blue fabric in the middle is from the same line but I'm going to use it consistently throughout my quilt. It will be the green from my inspiration quilt above. 

Here's a few tutorials I'm using: 

Both offer just about the same methods but include different photos.

Step Two: Size of Blocks

To make this quilt you will need some form of paper backing. I've chosen to use notebook paper and recycled computer paper. It really doesn't matter what you use, just don't use anything think like card stock. Trim your paper to the size block you want to make. My block was determined by my fabric. I am using a 10" charm pack and when I cut my fabric into strips the largest block I could use and still get the fabric to cover was a 6 1/2" block. Trim your paper to determined square size. I will need 72 blocks for my throw size quilt 54"x 72" or there about.


Step 3: Cutting your fabric

For my main piece I decided to make strips 1" wide. All of the other fabrics I've made in 1.5" and 2"  and 2.5". 


Step 4: Glue... yes glue. 

You'll need a basic glue stick or two. If you want to copy my quilt and have a consistent color running though your quilt (mine's blue) then you will want to glue all of the same color and size fabric at this point. If you want the quilt to be more random then just glue any piece and any size.  

Glue your pieces of fabric directly to the middle of the paper on the diagonal. 

Step 5: Sew

This is where you'll need to refer to one of those tutorials I mentioned above. I didn't take any photos of this part. But basically you will alternate sewing right sides together, press, repeat, until your paper is covered. There isn't really a wrong way to do this. 
You'll end up with something like this: 


Step 6: Trim
Using your rotary cutter flip you fabric over so you can see the paper. Trim off the excess... you can save these scraps to use on your next piece- especially as you get to the corners and you only need a little piece. 


There will be more steps on assembling the quilt. Like I said I'm still making my blocks, and I hope you will join me too! 
Here's my WIP (Work in Progress) laid out. 

I also joined a quilt block swap and used the same style to make this 12" quilt block. It's all sewn together. 


I finished the quilt top in December 2015. I hemmed and hawed about the lay out for quite a while. In the end I went with the one Marvin liked best as it will likely be a quilt that staying in our living room. 


I went with layout #4. It is all sew together now and I'm going to try spray basting it. The spray baste I got was from JoAnn Fabric. 

The backing fabric is a double gauze from Cotton & Steel. It is mustard color. Gauze is a sheer light wait fabric but when it's double (hence double gauze) it is not transparent and is incredibly soft. I'm hoping it will give my quilt a cuddly feel. Here is what one blogger says about Double Gauze


My binding will be the same blue speckle that is creating the diamond style in the quilt. 

Sewing Level: Beginner
Cost to make: WIP... so far about $60
Time: 6 hours

3.31.2015

Hexagon Table Runner

So I've been talking about HEXIES in a lot of other posts. Finally, I'll let you onto what I've been doing with them! 

FIRST- What is a hexie? It's a mini-hexagon. I made 1" hexies for my project but you can make them in a bunch of different sizes. 

There are a few hexie-bucket-list-projects I'd like to accomplish. 
  • The quilt to the left has 5" hexies. I'm thinking it'd be lovely in our master bedroom. 
  • The mini-hexi quilt to the right is made up entirely of 1" hexies all sew together by hand. This might be a project I finish when I'm 70! It'll take that long to get all the hexies made! 
  • The pin cushion is something I'm currently working on for a swap I just joined. I think it'll be pretty fast and I hope to make a few of these. If you're into sewing, let me know and I'll send you a hexie pin cushion :)


My friend Sarah has a great tutorial on how to make them. Here's another too. They are sewn by hand. Once you get the hang of it, making them goes pretty fast. I love the fact that they are done by hand because I can do them on the couch when we are watching TV or in the basement when I'm watching Moses play. 


For the 1" hexies you'll want to start with scraps of fabric that are approximately 2 1/2" x 2 1/2". That's why I love the mini-charm packs. They are the exact right size. You can most definitely use your scrapes too. Because I just started sewing I didn't have any scraps when I started so I bought mini charm packs for about $4 each. Etsy sells then as do some more modern quilt shops. 


You'll next need a paper template to fold your fabric around. I initially just googled it and ended up with hexies that were 7/8" and not 1". Not too big of a deal for some projects but for my table runner the layout was a killer because they were not exactly 1". So go to Sew Quickly and use this template as it's exactly 1"- tried and true. 
Here is a finished example of 1" hexie. 


If you want to see the professional photo for my inspiration click HERE. I didn't want to put their photo directly next to mine because theirs is undoubtable better and more professional but I think mine turned out just great! 

So here's my WIP (Work in Progress). The quilting process was surprisingly easy. It was laying out the hexies that took me FOREVER! Remember I said mine were only 7/8" and not a full 1"... it would've been easier with 1"


My finish table runner! I'm so happy with it.


It took almost 70 hexies. It's about 36" long and 12" wide. Most of the fabric was from charm packs- Cotton and Steel fabric line. 


Just so you don't think hexie making is new.... below is a quilt my great-grandma made and is now on my guest bed.  It's called Grandmother's Flower Garden and the pattern has been around for ages. This should be added to my bucket list too. 


Sewing Level: Beginner- except the laying the pieces out - you basically need to be a rocket scientist or use 1" hexies! 
Cost: $12
Time Commitment: 10 hours


3.25.2015

Moda Scattered Square Pillow

I got on a kick of buying MINI CHARM PACKS. They are awesome in so many ways. You get to see a large portion of a pattern line and they usually cost under $4. It's a cheap thrill. 


So after buying the mini-charm packs I started to make hexies (more on that later) but I wanted to complete something sooner than the hexies would allow.  I searched Pinterest for "what to do with mini-charm packs". That's when I found this tutorial for the scattered square pillow


My inspiration

I used mostly Vanessa Christensen's Color Me Happy fabric line. The basic white was purchased from JoAnn Fabrics and the backing and binding was picked up at a quilt shop in Indian River. 

The tutorial I used above was very helpful but when I got to the "put the binding on" part. I had to google some more. I found this helpful you-tube video that talked about machine binding.
YouTube: https://www.youtube.com/watch?v=xWh90tXr7g4&index=2&list=WL


Overall I liked machine binding but in a few places I either had to go back and sew over again to catch the back binding or I hand stitched it. I thought it was MUCH faster than hand quilting and it looked pretty good too! 

Materials: 
The pillow took just under 1 charm pack- but I mixed a few packs together. The binding and border were each 1 fat quarter and the back was a 20"x20" piece. You'll also need batting and another layer under the batting to make the pillow top. A full material list is in the tutorial. 

So here's my finished pillow: 

It's holds a pillow that is 20"x 20". It may be a little over stuffed but I like how it makes the stitching of the quilt layer POP. Quilting the top was my favorite part. I love how it adds texture. I also got used to using a walking foot on this pillow. It is a necessity when trying to quilt the top and feeding multiple layers through your machine at one time. It was VERY easy to use. 


The back I wanted to be a solid pattern in case I needed to make my couch a little more neutral. I added the trim piece where the pillow comes together. 

The pattern does have the colored squares off centered and I achieved that! However my white boarders are supposed to all be the same size and straight- I failed at that. The good news though is that I failed all over so it looks like it's supposed to be that way. I attribute this fail to not sewing on a scant 1/4" accurately. Accuracy isn't my strength right now but it will come with time. 


Sewing Level: Beginner just measure accurately and go slowly
Cost: $20
Time: 5 hours

Special materials: Walking foot